
Settings
Under settings menu we have added new settings page -
1. General Settings
2. Project Settings
3. Unique ID Settings
4. Account Statement Settings
5. Payment Settings
6. Account Statement Print settings
7. Email Settings
8. Client Area Settings
9. Custom Settings
Pattern 1 = FirstName (1 Letter) LastName (1 Letter) - (Auto Increment Number)
For example contact name is Prakash Chandra, for this name unique id is CO-PC-1, another contact name is Pravin Chopra, for this name unique id is CO-PC-2 ,Here CO stand for Contact
Pattern 2 = LastName (1 Letter) FirstName (1 Letter) - (Auto Increment Number)
For example contact name is Prakash Chandra, for this name unique id is CO-CP-1, another contact name is Pravin Chopra, for this name unique id is CO-CP-2 ,Here CO stand for Contact
Pattern 3 = CO- Auto Increment Number Only
It takes only auto increment number Like CO-3, suppose 2 contact created before this that's why auto increment number is 3, Here CO stand for Contact.
If you edit any contact unique id pattern then it looks like this CO-C-KP007,Here CO means Contact, C means custom, KP007 written by you.
Pattern 1 = Company Name (1 Letter for each Word) - (Auto Increment Number)
For example company name is Raj Associates Private Limited, for this unique id is C-RAPL-1 , Here C stand for Company
Pattern 2 = C- Auto Increment Number Only
It takes only auto increment number Like C-2, suppose 1 company created before this that's why auto increment number is 2, Here C stand for Company.
If you edit any company unique id pattern then it looks like this C-C-ARS14, Here 1st C means Company, 2nd C means custom, ARS14 written by you.
Pattern 1 = P- Company Name (1 Letter for each Word) - Service Name (1 Letter for each Word) - (Auto Increment Number)
For example there is a project which company name is Raj Associates , service name is Income Tax Return , so Project Unique ID is P-RA-ITR-1, where P stand for Project, RA for Raj Associates, ITR means Income Tax Return and 1 is auto increment number.
Pattern 2 = P- Company Name (1 Letter for each Word) - (Auto Increment Number)
Example P-RA-2, where P stand for Project, RA represents Raj Associates and 2 is auto increment number.
Pattern 3 = P- Service Name (1 Letter for each Word) - (Auto Increment Number)
Example P-ITR-3, where P represent Project, ITR means Income Tax Return and 3 is auto increment number.
Pattern 4 = P- CurrentYear - Auto Increment Number Only
Example P-2017-4, where P represents Project, 2017 is Current Year and 4 is auto increment number.
Pattern 5= P- CurrentYear - Month - Auto Increment Number Only
Example P-2017-04-5, where P represents Project, 2017 is Current Year, 04 means april month and 5 is auto increment number.
Pattern 6 = P- Auto Increment Number Only
Example P-6, where P represents Project and 6 is auto increment number.
If you edit any project unique id pattern then it looks like this P-C-ARS14,
Here P means Project, C means custom, ARS14 written by you.
Pattern 1 = T- Company Name (1 Letter for each Word) - (Auto Increment Number)
For example there is a transaction which company name is Raj Associates , so Transaction Unique ID is B-RA-1, where B stand for Bill Transaction, RA for Raj Associates, and 1 is auto increment number.
Pattern 2 = T- CurrentYear - Auto Increment Number Only
Example R-2017-4, where R represents Receipt Transaction, 2017 is Current Year and 4 is auto increment number.
Pattern 3= T- CurrentYear - Month - Auto Increment Number Only
Example B-2017-10-5, where B represents Bill Transaction, 2017 is Current Year, 10 means October month and 5 is auto increment number.
Pattern 4= T- CurrentYear - Month - Day - Auto Increment Number Only
Example D-2017-10-5-6, where D represents Discount Transaction, 2017 is Current Year, 10 means October month, 5 means day and 6 is auto increment number.
Pattern 5= T- Auto Increment Number Only
Example O-7, where O represents Other Transaction, and 7 is auto increment number.
Note - T represent transactions which are probably type of Bill (B), Receipt (R), Other (O) , Discount (D).
Pattern 1 = SE- Company Name (1 Letter for each Word) - (Auto Increment Number)
For example there is a Settlement which company name is Raj Associates , so Settlement Unique ID is SE-RA-1, where SE stand for Settlement, RA for Raj Associates, and 1 is auto increment number.
Pattern 2 = SE- CurrentYear - Auto Increment Number Only
Example SE-2017-4, where SE represents Settlement, 2017 is Current Year and 4 is auto increment number.
Pattern 3= SE- CurrentYear - Month - Auto Increment Number Only
Example SE-2017-10-5, where SE represents Settlement, 2017 is Current Year, 10 means October month and 5 is auto increment number.
Pattern 4= SE- CurrentYear - Month - Day - Auto Increment Number Only
Example SE-2017-10-5-6, where SE represents Settlement, 2017 is Current Year, 10 means October month, 5 means day and 6 is auto increment number.
Pattern 5= SE- Auto Increment Number Only
Example SE-7, where SE represents Settlement, and 7 is auto increment number.
Default file link validity setting is available in settings section. You can choose Maximum 60 days link is active after it, link will expire.
Project Settings contain
1. Review Project system on/off button
2. Default Completed to Review Period change setting
3. Maximum Review Time Period setting
4. Auto Create Service Scheduler Projects on/off button
5. Auto Add Company Service on/off button
6. Maximum TimeSheet Days setting.
In settings module you can change maximum timesheet days. Maximum 60 days allow for timesheet fill.
Yes , Auto Add Company Service ON/OFF button is available in settings module. ON this button if you wants Add Services to Company automatically if any Project gets Created.
Auto Create Service Scheduler Projects ON/OFF button is available in settings module. ON this if you wants Create Service Scheduler Projects Automatically otherwise projects goes to Service Scheduler page where you can create projects by just click on tick button.
Goto settings page then project settings tab and ON Review Projects button for start Review Projects System.
For Changing Completed project to review project time period go to settings page then click on project settings tab, here you can manage Default Completed to Review Period. Maximum 60 days allow for this. After This Period Completed Projects will be moved to Review Mode if Review Projects is ON else Project will be moved to Finished State.
Go to settings page then project setting, here you can change Review Time period, maximum 60 days allow for this. After This Period Under Review Projects will be moved to Finished State with Default / None Review. Only Applicable if Review Mode is ON.
After this Period any UnSettled Transaction with minimum of this Total Amount and Period will be treated as Pending and Requires Update. For changing transaction period go to settings page then Account statement setting tab, here you can change transaction period. Maximum 365 days allow for this.
Yes, Payment and Bank Setting is available in setting page. Goto setting page then click on Payment Setting tab. Here you can Provide your Company's Bank Account Number, Bank Branch, Bank Branch IFS Code, Online Payment Gateway keys, GST Number and more setting for online payments.
Yes, Account Statement Print setting is available in settings page. Print Bill Head for Tax invoice, Print Bill End, Print Ledger Head for Unsettled Ledger, Print Ledger End, Print Receipt Head, Print Receipt End, Print Settlement Head for Settled Transactions, Print Settlement End setting is available in Account Statement Print setting.
Yes, Email/SMS Setting is available in settings page. Here you can set Email Banner Image, Email Banner Background Color, From Email, From Name, Reply To Email, Reply To Name, SMS Sender ID .
For this goto settings page then click on Client Area settings, here you can start Chat api, change Buy - Tax text, change Buy - Support text and ON/OFF Add Website User Automatically (Powered by easycloudbooks website), This permits EasyCloudBooks to Add User Automatically which log in to your Website.
Back Dated Voucher Date:
Doesnt allows user to create Vouchers whose entry date is lesser than specified date. And it remains same.
Back Dated Voucher Period:
Doesnt allows to create vouchers whose entry date is not in the range of specified days. Keeps changing with everyday.
Ex: If it is set to a 10 days and present date is 09/05/2018 then system will allow to create vouchers whose entry date is date is in this range: 30/04/2018 to 09/05/2019.
And on 10/05/2018, valid range would be 01/05/2018 to 10/05/2019.
In Settings page, Under General Settings Year Start Date field is available. This date helps EasyCloudBooks identifying Project Year and Other Possible Date Ranges. It will take 30 minutes to reset.
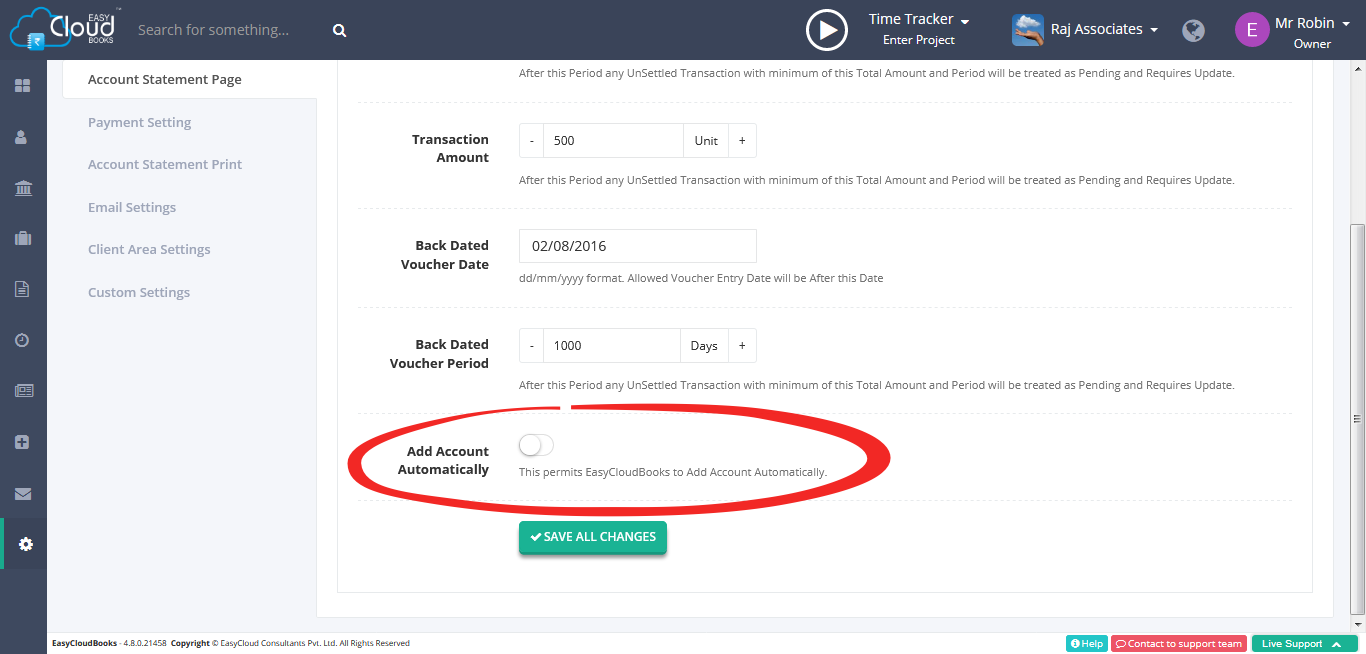
Go to Settings page, under account statement setting tab 'Add Account Automatically' button is available, if this button is ON then whenever new company created, related account automatically created in accounts page.